The Sync Backup functionality of MySword 13.0 helps you backup and/or synchronize all downloaded files including modules like Bibles, commentaries, dictionaries, books and fonts aside from user created files like journals, notes and files in the mydata folder which stores preferences (settings), bookmarks, formats, highlights, verse list, etc., with another local folder called Remote folder or Cloud Storage provider like Google Drive (currently, only Dropbox, Google Drive and Microsoft OneDrive are supported; please Contact Us if you need additional provider). It's advisable to backup/sync at least the user files (journals, notes and mydata) as modules can be downloaded from MySword server.
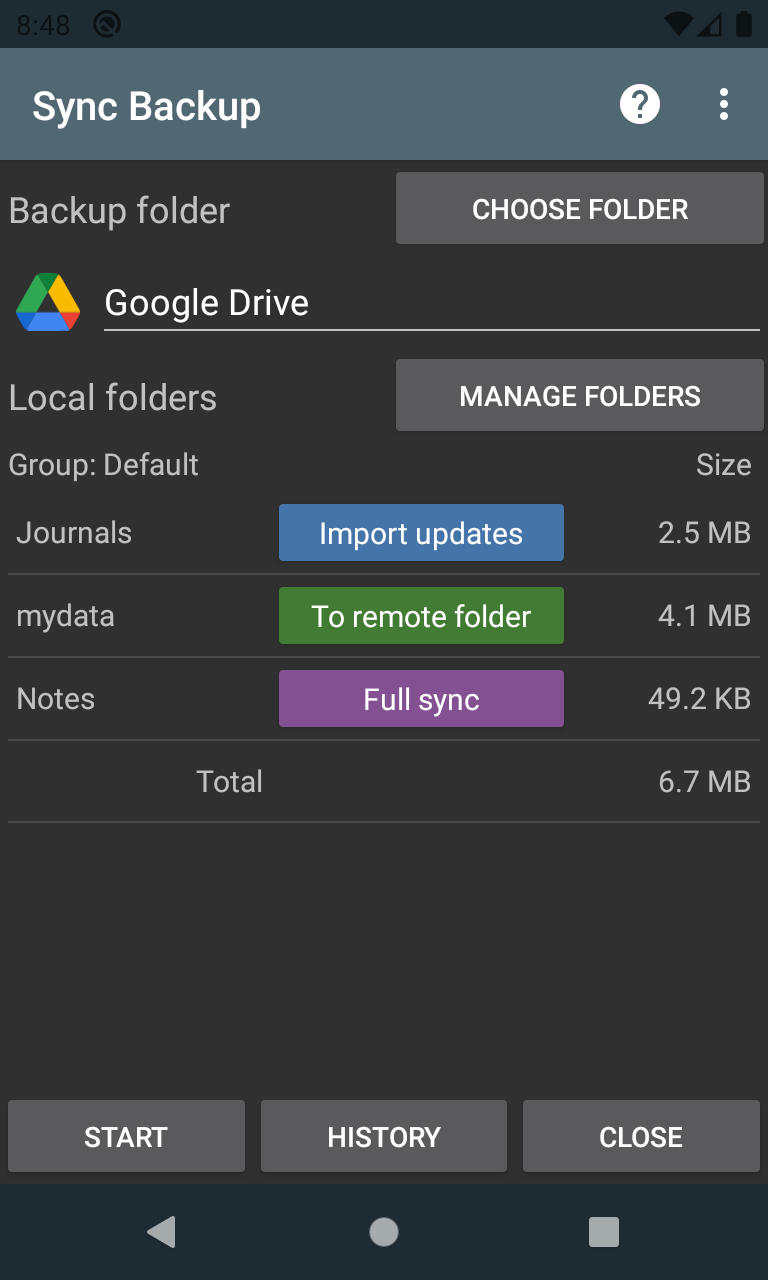
To setup, first select the Backup folder, then choose MySword folders and files to include using Manage Folders, then tap Start to start the sync. See the following for more details.
Backup Folder
Choose first a Backup Folder where the files will be backed up (from Local or MySword modules' path to Remote) or where the backup files are located for retrieval (from Remote to Local) by tapping Choose Folder. This folder can be a local folder located in the Internal Storage; or External SD Card but located at /Android/data/com.riversoft.android.mysword as that's the only folder allowed for read/write operation; or this can be Cloud Storage.
For Cloud Storage, you will need to sign-up using an appropriate account before that can be used. You can sign-out anytime by using the Menu (the 3 dots at the top right) then tap Sign-out Cloud. The name of the backup folder created is MySword-Backup.
Note that the selected Backup Folder is shown on the second line just below the Backup Folder label. Non-cloud folders (those on the device) starts with a slash (/) and contained the complete path to the folder.
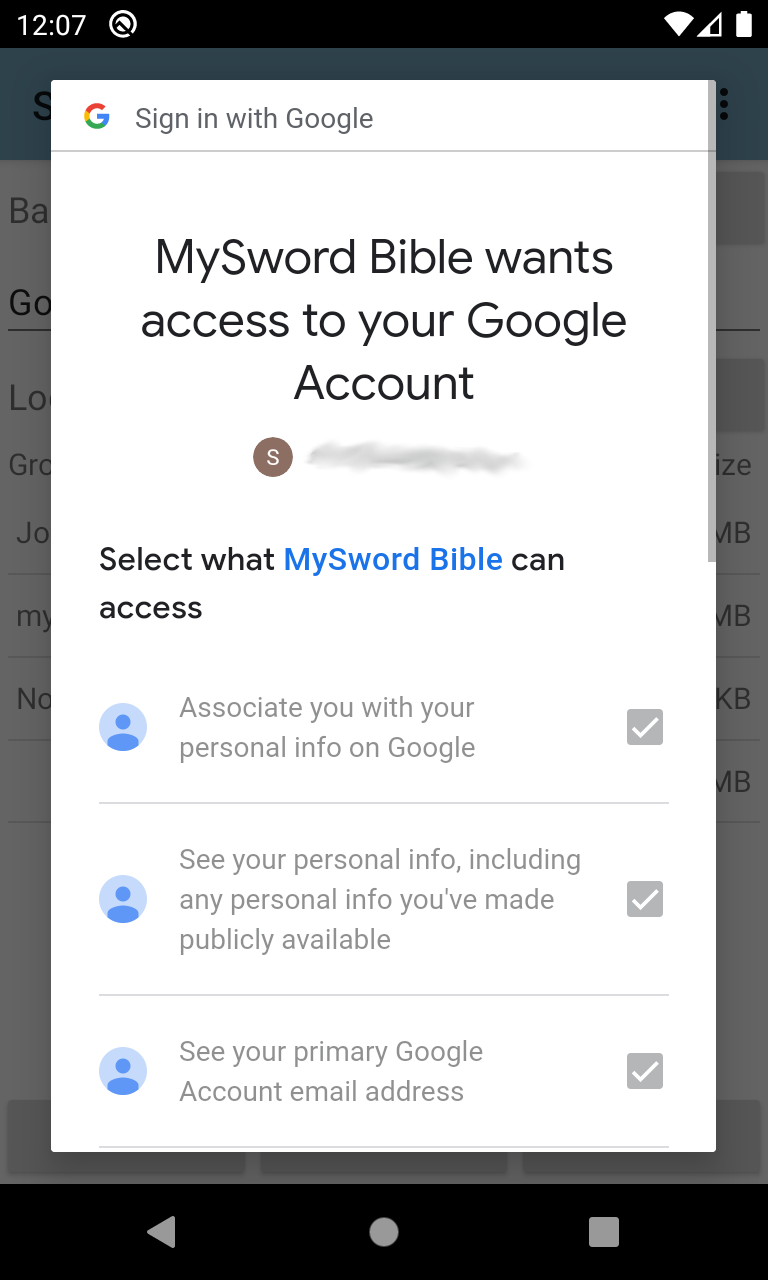
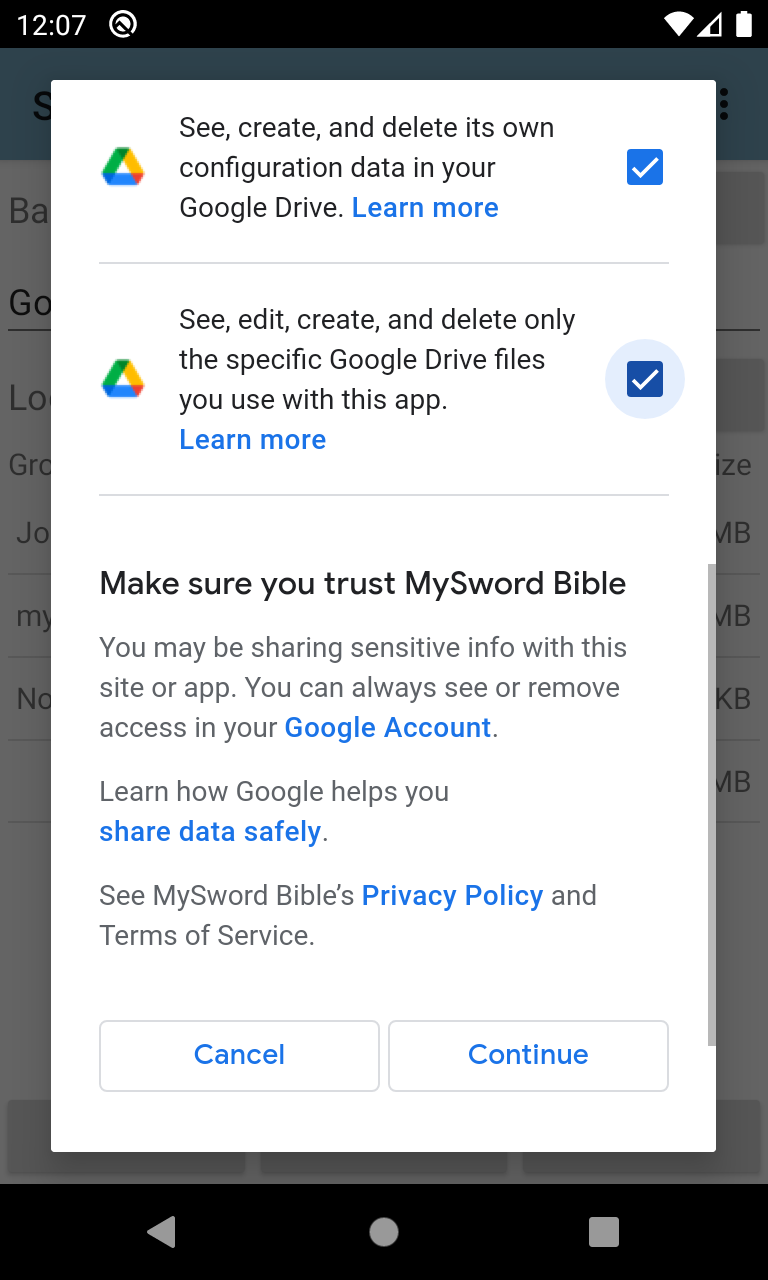
Note also for Google Drive, when you are asked the first time in "Sign in with Google," please check the following so Sync will work:
- See, create, and delete its own configuration data in your Google Drive.
- See, edit, create, and delete only the specific Google Drive files you use with this app.
You may need to scroll the screen down to see the 2 unchecked options.
Manage Folders
The selected folders to be backed up or synced are displayed just below the Local Folders label. Group: Default means the Default group is currently chosen. Named group allows you to save the selected folders/files so you can easily switch from one to another. Default is the system default group.
Note that if all modules are included in the backup, a significant amount of storage space could be used so make sure you still have enough storage space. The default installation without additional modules actually requires at least 150 MB. For power users, 1 to 3 GB is normal. However, if only journals, notes and mydata are backed up, it's usually around 100 MB depending how a prolific writer you are. The main Sync Backup screen actually shows the total size of the files selected to be backed up or synced per folder.
Note that the sizes KB, MB and GB are all in SI units (base 10) corresponging to 1,000; 1,000,000 and 1,000,000,000 bytes (and not the legacy base 2, so it will be higher).
Note also that in case of Cloud storage, the total space used will be charged against your quota. Note too that uninstalling MySword could cause the backup files to be automatically deleted from your Cloud Storage depending on the provider, especially when all your devices have uninstalled MySword.
Select the local MySword folders you want to be backed up or synced by tapping Manage Folders to the right of Local Folders label. This will open up a new screen which will show all folders of MySword. The topmost consists of the Group selector (currently Default), Add Group (+) and Delete Group (x). This lets you name a group of folders/files selection with Modes so you can easily switch from one group to another. For example, you can create a group named Publisher or To Remote and set folders/files with mode To remote folder for the device as source of updates. You can also create one named Subscriber or To local folder and set folders/files with mode To local folder for the device as receiver of updates.
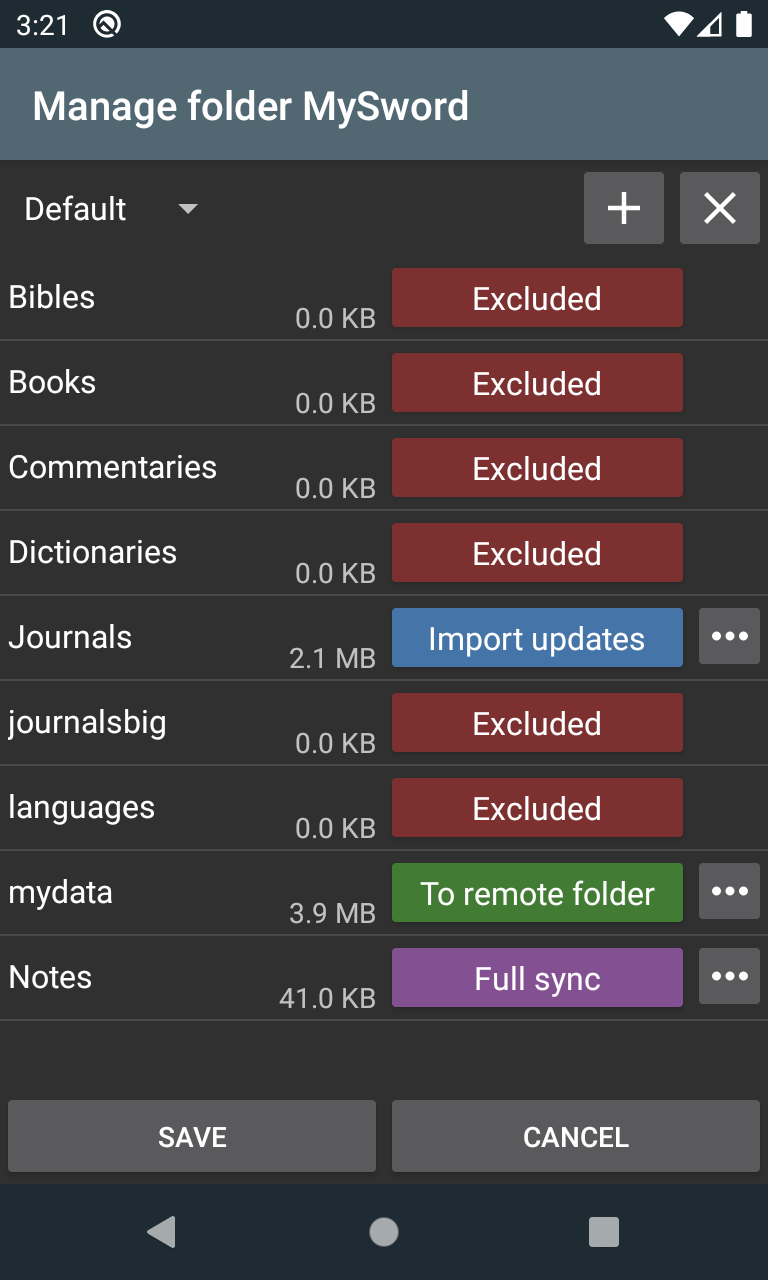
There are four columns below the Group selector: folder, total size, Mode and 3 dots. You can tap the Mode to change it. If the mode is Excluded, no 3 dots will appear. The 3 dots is used to go inside the folder so you can change the mode of individual files. Only two levels can be currently managed though (subfolders inside icons are currently not supported).
Modes
A mode defines the mode of transfer. There are four modes that can be used for the entire folder but there are two additional modes for journals and notes. The following are the modes.
- Excluded
Don't include the folder or file in backup or sync.
Note that when a folder is Excluded, the 3 dots to the right used to manage files inside that folder will not show up because all files under that folder will automatically be excluded as the folder is excluded.
- To local folder
Copy the file (or files) in the remote folder if it's not found on the local MySword folder or it's newer (by comparing the date/time modified of the two files). The device is set to receive updates or it's a subscriber of updates.
Note that due to a bug in the File System API of Android Nougat or lower, MySword cannot set the modified date of the file copied so it stays the same as date/time it is created or copied and can't be set to the same date/time as the source file. This affects copying into local folder or to a remote folder which is in the device. The Cloud Storage is not affected though as it's capable of supporting the setting of the modified date/time (the description is used for OneDrive though due to API limitations).
- To remote folder
Copy the file (or files) in the local MySword folder if it's not found on the remote folder or it's newer (by comparing the date/time modified of the two files). The device is set to send updates or it's a publisher of updates.
- Two way
Copy the newer file (or files) overwriting the older one. If file in the local MySword folder is not found on the remote folder or it's newer (by comparing the date/time modified of the two files) then it's copied to the remote folder. If file in the remote folder is not found on the local MySword folder or it's newer then it's copied to the local folder. The device is set to send and receive updates or it's a publisher and subscriber of updates.
Note and beware that the whole file is copied overwriting the other one. So for example, if two devices update the notes (or journal) making the Cloud backup old, then first device performed a Sync updating the Cloud version, the update of device 1 or device 2 may overwrite each other depending on which is newer (update of one device will be lost). If full synchronization of notes and journal's individual records is desired then you can use the Full sync discussed below.
- Import updates - Experimental in MySword 13.0 but should be stable the in next versions
This is only for Journals and Notes. Similar to Import Journals/Notes feature, individual records are compared instead of just the file modified date/time. Both sides are first sorted then the corresponding records are compared so that records not found on the local file are inserted, older records in the local file are updated, and newly deleted records in the remote are deleted on the local file unless the record in the local file is newer than the delete date/time. But unlike Import Journals/Notes, embedded images are also synchronized.
Note that for a file with many records like around a thousand or more, it may take more time to perform the synchronization as all records will have to be compared. Also, there will be more Sync log records saved as individual record checks/actions are recorded. It's still faster to use Two way mode but Import updates mode is very useful if both devices update the same journal or notes and you want to merge the updates.
- Full sync - Experimental in MySword 13.0 but should be stable in the next versions
This is also only for Journals and Notes. The procedure is similar to the above Import updates but if the local file has updates not present in the remote, it is copied to the remote folder overwriting the remote file making both files the same.
When you tap the 3 dots to the right of the Mode to manage files inside that folder, if the mode is edited for that folder it will be automatically saved as it's needed in the next screen. In this second screen, there are two menu actions at the top:
- Change All
Use this to change the mode of all files in the folder.
- Reset
Use this to clear the mode of individual files so the mode of the folder that was set will take effect.
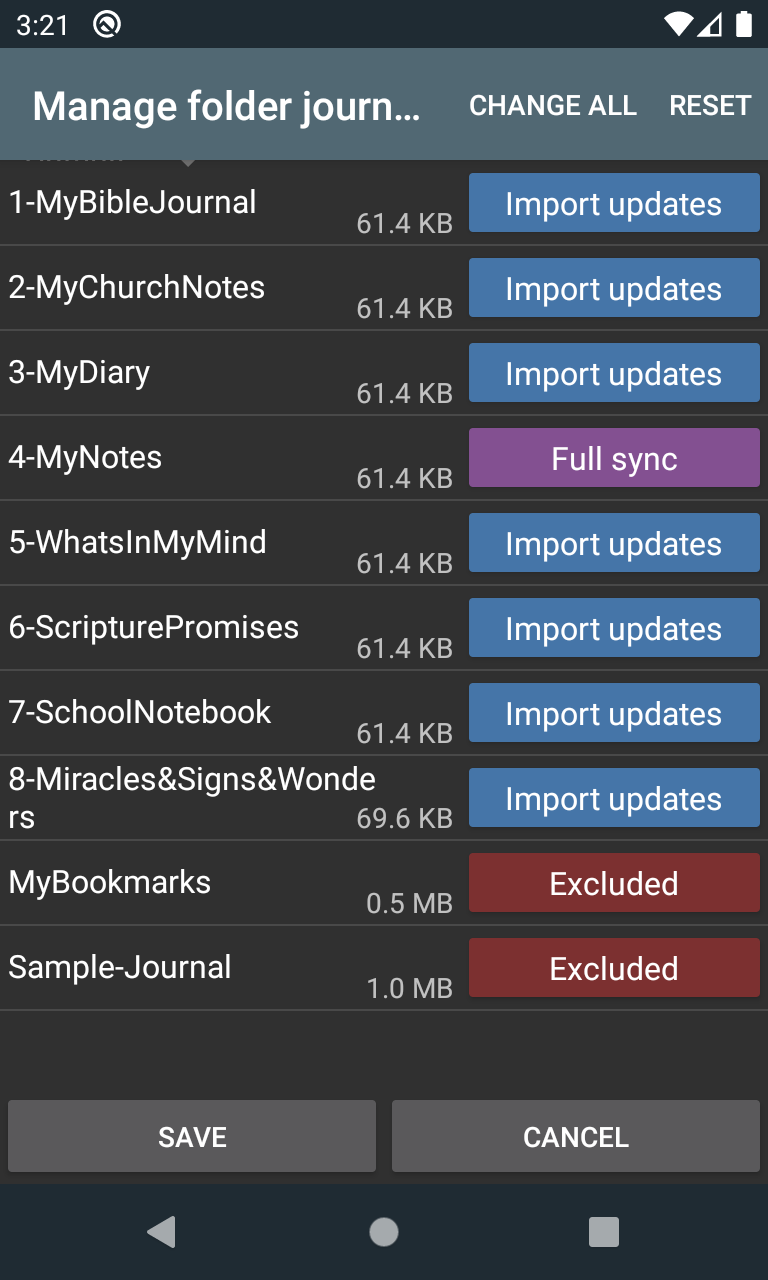
By default, all files will have the mode set for the folder but you can set the individual files.
Start Sync
Tap the Start button on the main screen to start the sync. The progress as well as the total download and upload (count and size) are shown on the screen. The detailed log also shows any error in red color.
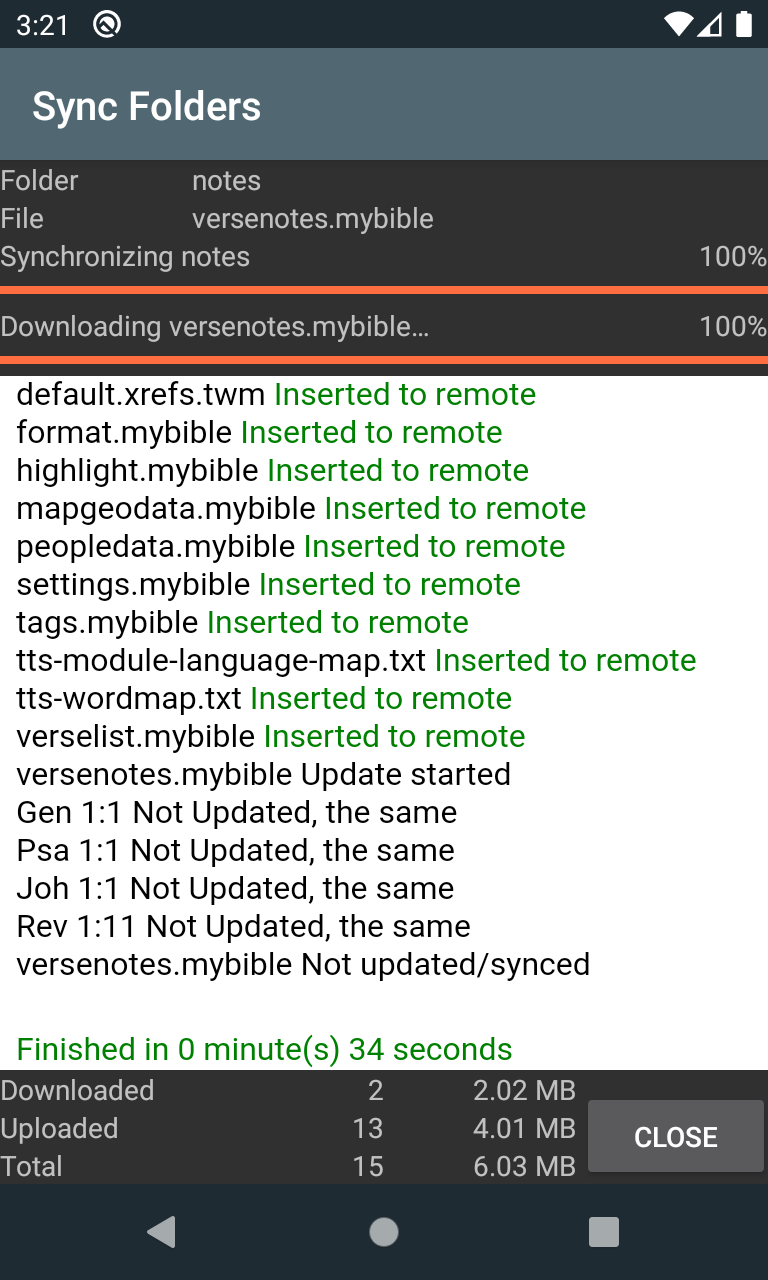
Note that you can cancel the sync anytime though.
History (Log)
Use this screen to see the log of previous syncs. Summary information is shown from the most recent to the oldest. There is also a Year filter on the top left. A red color date indicates an error or failure in the sync while green indicates success for the entire session. It's possible that there is a problem with one file but the others are fine though so the color is still green.
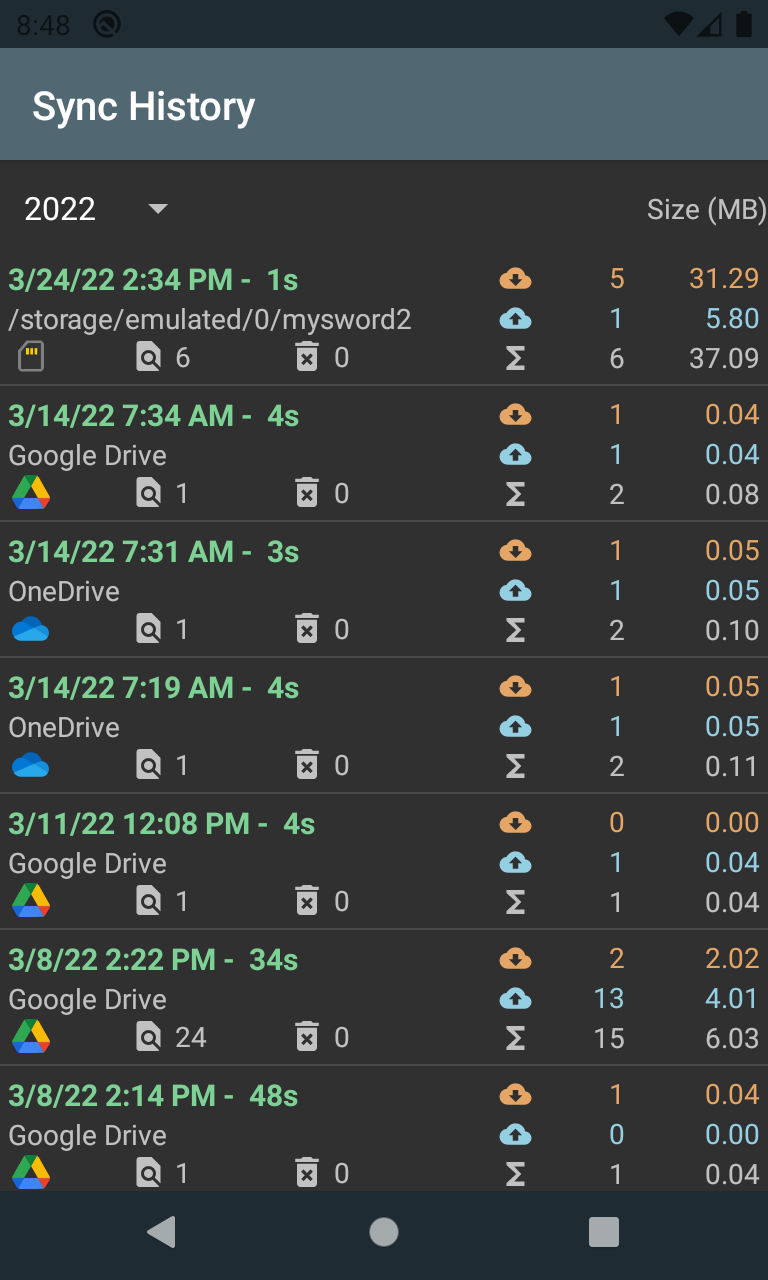
Tapping an item will show up the detailed log of a sync (which is similar to the actual sync).
Tips
The following are tips in using the Sync Backup:
- It's advisable to backup user files, those in the following folders: journals, notes and mydata. If you are using just one device, then set all folders to mode To remote folder.
- If you write journals, you can create a first journal let's call A in one device and update it and set the mode To remote folder but on the other device set the mode To local folder. Then create another journal let's call B and update it in the other device and set the mode To remote folder also but on the first device set the mode to To local folder. In this way the first device is the publisher of updates to journal A while the second device is the publisher of updates to journal B, and the first device is subscriber of updates to B while the second device is subscriber of updates to A. There are no conflicts in updates then with this setup.
- If the notes or the same journal file are updated on both devices, you can't use the mode Two way because you will be losing updates due to overwrites. You can use the mode Full sync instead. Note that if there are too many records, the sync will be longer though as records on both files are compared for updates.
- The settings.mybible file in mydata folder contained all preferences (or settings) including the current Bible and current module in other module types, current verse, current topic for each journal, current word for each dictionary, etc. If one device is set To remote folder and the other To local folder, all preferences in the first will be copied to the second. It's not advisable to use Two way mode as the device that's used last will normally always have the file updated when you move to the next verse causing the update of the other overwritten. It's only advisable to have it Excluded, or set to either To remote folder or To local folder.
- If you use independent Bookmarks on two or more devices, then the treatment for bookmarks.mybible file in mydata folder is similar to settings.mybible so just use Excluded.
- Files inside mydata folder like highlight.mybible, format.mybible, tags.mybible and verselist.mybible cannot have Import updates nor Full sync modes so care must be taken for not overwriting updates. It's advisable to update only on one device set as publisher of updates (mode set To remote folder) while the other is just a subscriber of updates (mode set To local folder).
- Deletes are only supported in Import updates and Full sync (record deletes only) but file deletes are not yet fully supported in Cloud. Please use the provided app of the Cloud service or the browser.
- In case of corrupted, truncated or incomplete uploaded file due to network failure, you can manually delete it using the Cloud service provided app or the browser. Alternatively, you can just update the journal, notes or file affected in MySword app to make it recent then perform the sync again.
Happy syncing MySword!
