MySword 7.0 Deluxe version supports Reading Plan and Own Progress Tracker (for those who do not use a fixed reading plan but want to keep track of their progress in reading the Bible for any period of time).
- First time use of the Reading Plan Feature
- Creating a Reading Plan
- Importing a Reading Plan
- Creating an Own pace / Progress tracker
- Managing plans
- Compact view and Non-compact view for Plan types
- Navigating through the plan or progress tracker
- Reading a verse range in a plan
- Marking a reading as read or unread for Plan types
- Updating the date read
- Resynching dates of unread entries for catch up
- Adding a reading progress for Own pace / Progress tracker
- Deleting/Editing a reading progress entry
- Viewing Progress report
- Printing the reading plan / progress
First time use of the Reading Plan Feature
The Reading Plan screen can be accessed using the Reading Plan icon (a calendar with a number/day of 31) which is located at the top Bible bar button at the far right (you can rearrange the buttons by going to the Menu->Preferences, select Buttons arrangement near the bottom then Bible view buttons) for the non-Compact mode view or the Bible view Navigation Drawer near the bottom for Compact mode (Also, for Compact mode, you can add the Reading Plan icon/button either on the Menu/Action bar on the top or custom buttons at the bottom also by going to the Preferences).
The first time you open the Reading Plan screen, MySword will ask you to create a reading plan or alternatively an own pace progress tracker as illustrated next.
Creating a Reading Plan
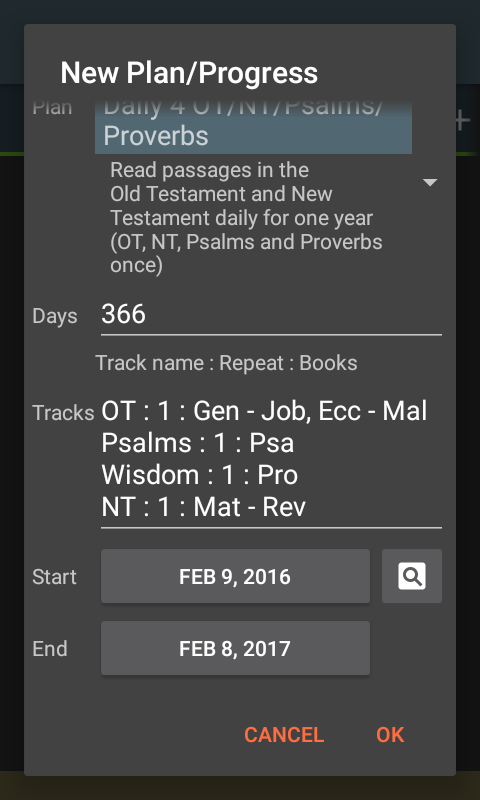
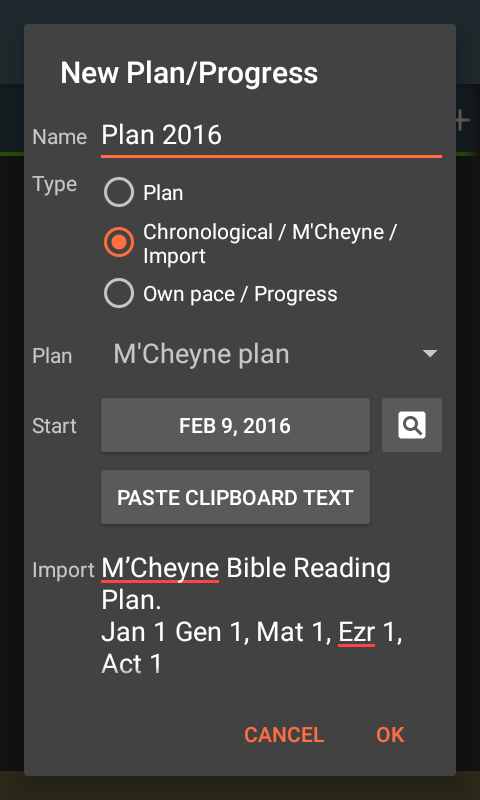
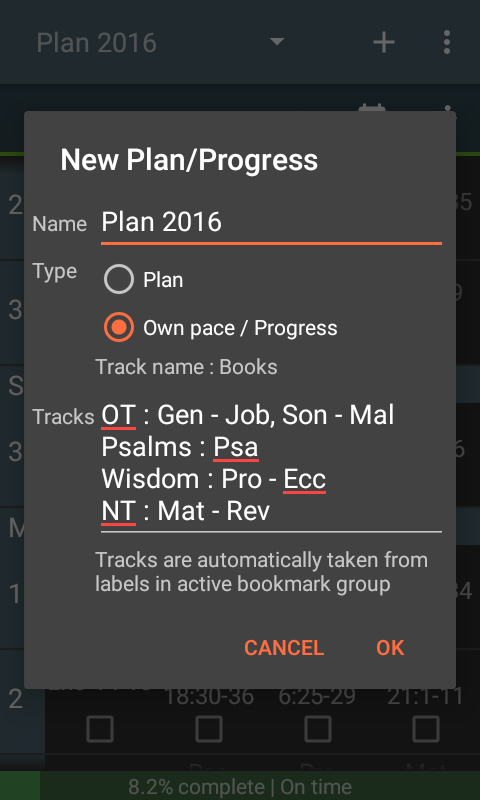
You can create a new Reading Plan or Own pace progress tracker by tapping the + icon on the Action bar (New Plan/Progress). Also, the first time you open the Reading Plan screen, MySword will ask you to create a reading plan or alternatively an own pace progress tracker. The four screen shots below shows the dialog for Plan type, the second one shows the bottom portion (swipe the contents up to see the bottom portion), the third shows the Chronological / M'Cheyne / Import reading plan, while the last shows Own pace / Progress.
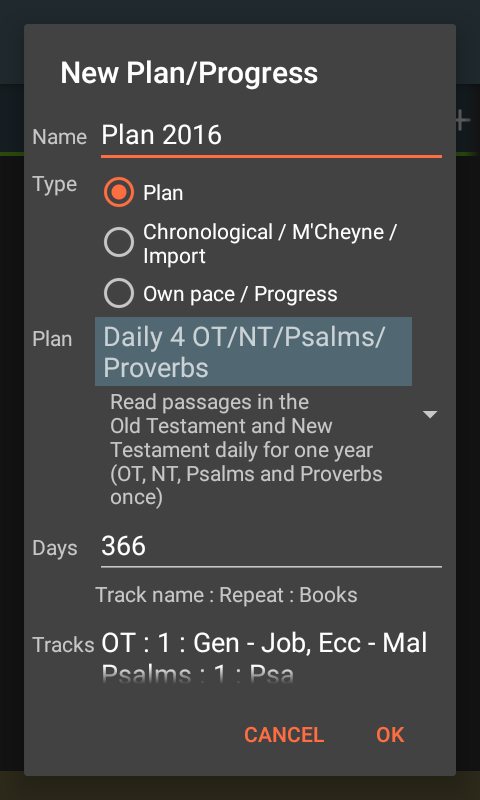
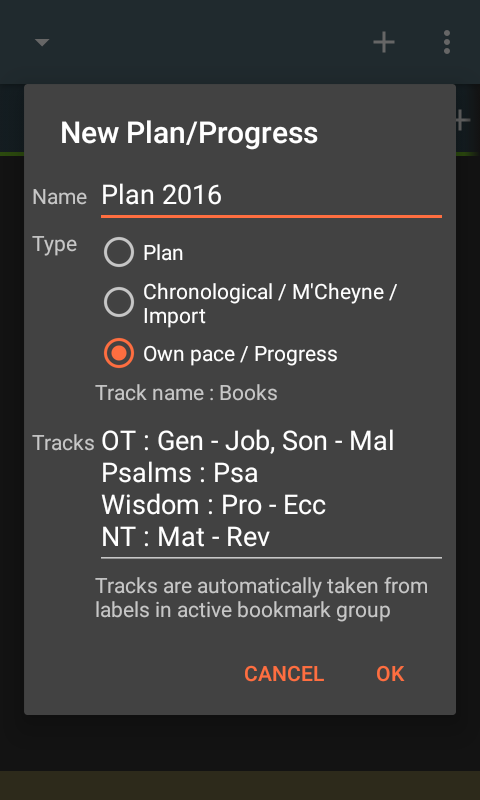
Here are the fields:
- Name
- The plan name is required to be unique to identify the plan. You can create many plans, archive old plans and even have multiple active plans.
- Type
- Plan - a reading plan
- Chronological / M'Cheyne / Import - for reading plan with flexible tracks and books can be split in different non-contiguous dates, and can also be used for importing from other sources via clipboard
- Own pace / Progress - is an own pace progress tracker. You can use this if you do not use a fixed reading plan but want to keep track of your progress in reading the Bible for any period of time
- Plan
- For Plan type, you can select from any pre-built common reading plans like a plan with 4 tracks (OT, NT, Psalms and Proverbs), 5 tracks, 3 tracks, Daily Gospel, Daily Wisdom, 90-Day Challenge, etc. You can then customize it using the other fields below.
- For Chronological / M'Cheyne / Import type, you can select from 3 pre-built plans: Chronological plan, Chronological NT plan, M'Cheyne plan.
- Days
- The number of days or the period of the plan. If you do not want to do complex date arithmetic regarding the number of days needed if you want to end on a specific date, just use the End date selector at the bottom.
- Tracks
- For Plan and Own pace / Progress types, it enumerates the tracks of the plan in the format Track name : Repeat : Books. You can check the different pre-built plans and see how this field is filed up. After selecting a plan, you can also customize the tracks like add another track in a new line, delete a track line, increase the repeat count, or change the books or book ranges.
- Import
- For Chronological / M'Cheyne / Import type, this shows the Bible verses to be read per day. Alternately, irregardless of the setting of Plan, you can paste here via the Paste Clipboard Text or via long tap the reading plan you had copied from other sources.
- Paste Clipboard Text
- Used to paste the contents of the copied reading plan from other sources into the Import field.
- Start
- Used to select a starting date. It is actually advisable to always start reading the Bible today.
- End
- Used to select the ending date as an alternate to specifying the number of Days.
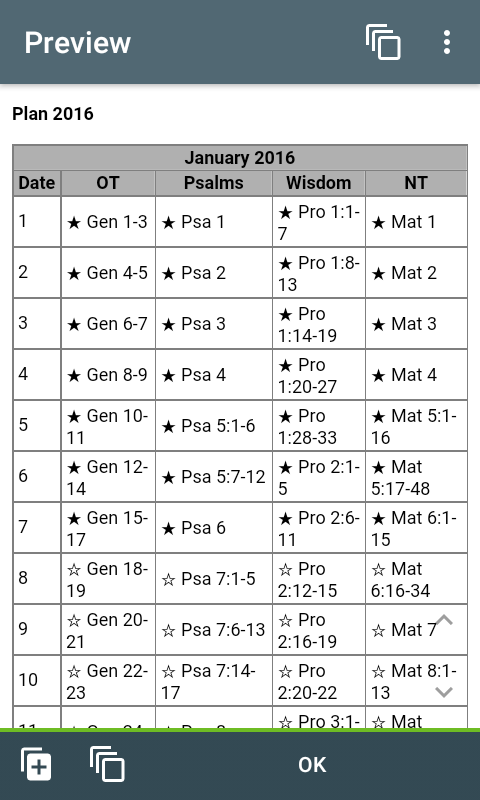
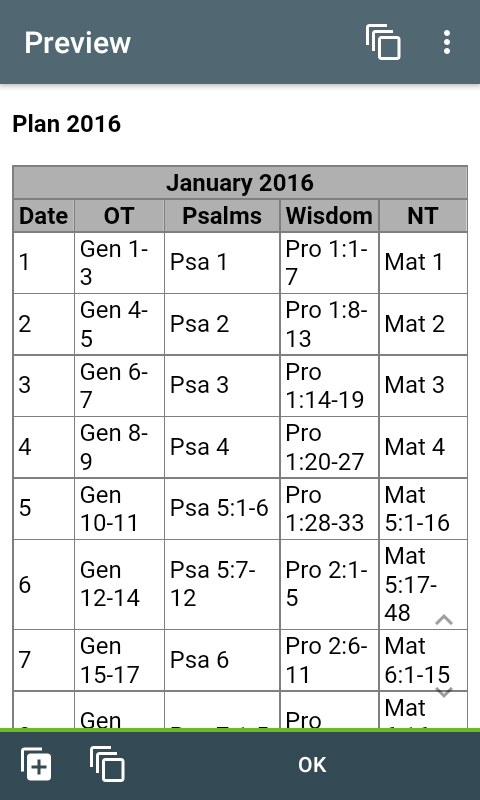
- Preview
- The preview icon to the right of the Start Date can be used to Preview the plan.
- The screen first screen shot shows a Preview of a Plan type while the second one shows a Preview of Chronological / M'Cheyne / Import type.
-
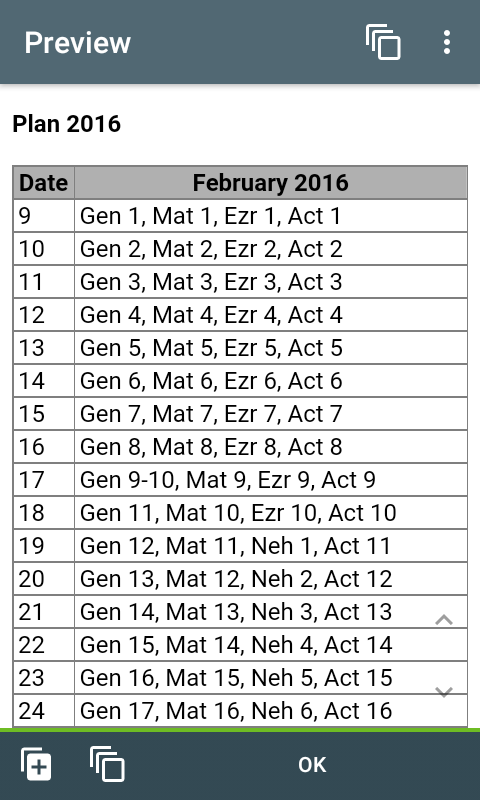
Importing a Reading Plan
You can import a reading plan from other sources by selecting Chronological / M'Cheyne / Import type. You can then just ignore the Plan selector and the current contents of the Import text box. Just copy into the clipboard the reading plan from your source then use the Paste Clipboard Text button. The pasted reading plan format must be something MySword can parse, recognize or import. Each line is for a day and must begin either with the word Day, month name or 3-letter abbreviation of the month name in English or just a number followed by a dot. After that, the list of Bible references are expected to use standard abbreviation or full name of books, otherwise they cannot be captured as MySword will just ignore text that it cannot recognize. The verse list for a day can also be broken by lines if quite long. Here are some valid examples from popular sources:
|
Day 1 - Genesis 1-3 |
|
|
1. Genesis 1-3 |
|
|
Jan 1 Gen 1-3 |
|
|
Jan 01 GENESIS 1:1-3:24 |
Copying PDF contents is a lot easier via Desktop as it is possible to copy multiple pages but in the Android device, most PDF viewers can only Select All one page at a time. Fortunately, the reading plan only spans 2 to few pages so you can just copy paste one page at a time into the Import field.
You can also check the built-in Plans like Chronological, Chronological NT (just a subset of the first) and M'Cheyne.
Note that Reading plans created by import or using the built-in Plans like Chronological and M'Cheyne will have track names 1, 2, 3, 4 and so on. The names are only visible in non-compact mode though. Also, the number of days is fixed and cannot be changed as it depends on the actual number of days of the plan. However, you can always specify the Start Date, default to date today, and does not have to be always January 1.
Creating an Own pace / Progress tracker
You can use this if youdo not use a fixed reading plan but want to keep track of your progress in reading the Bible for any period of time. First of all, you have to use the Bookmarks screen for bookmarking your current verse per track. The labels in the current bookmark will be used as track names so you will have to first create them (with the current verses). Then when you create a Plan and select Own pace / Progress as Type, the Tracks field will automatically be filled up with the tracks (labels) and the possible book ranges. You will have to edit the book ranges if the labels you use are not known to MySword (known labels contains any of the words: Psalm, Prov, Wisdom, New Testament, NT, Old Testament, OT).
Managing Plans
You can archive old plans so that they do not appear anymore in the list of plans on the top bar combo box of the main screen of the Reading Plan, change the name of the plan or edit the tracks of an own pace / progress tracker by tapping the Manage plans menu on the to the right of the + (New) button (in case of small screen phones, you can access the Manage plans via the overflow 3 dots icon on the top far right). Here is the screen that will show up:
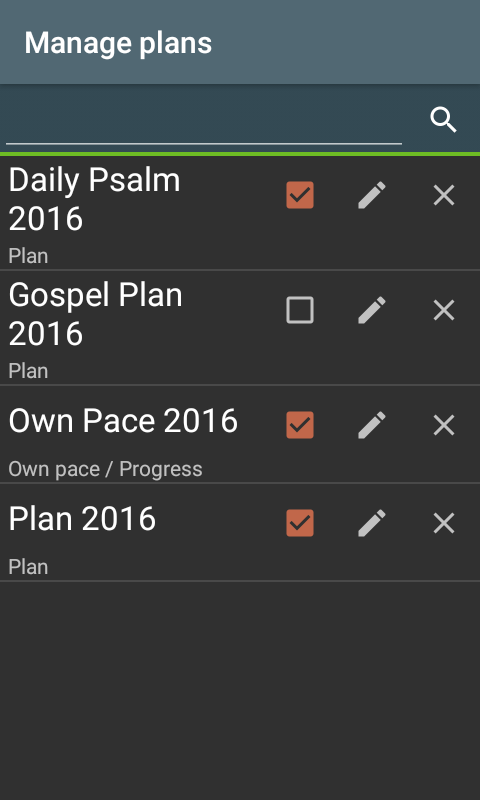
The 3 icons/buttons on the right side are for:
- Enabled
- When unchecked, the plan will be archived and will not show up on the main Reading plan screen. You can always unarchive a plan.
- Edit
- This is used to edit the plan name. In case of own pace / progress type, you can also edit the tracks.
- Delete
- This is used to delete the plan including all associated readings. In case you already had reading entries that are checked for plan type or you had already added own pace / progress entries, you will be asked for a confirmation entering the first 3 letters of the plan name in lower case to prevent unwanted deletion.
The text box on the top in conjunction with the Search button is used for filtering the list by using a keyword matching the plan name. This will be useful in the future when you had accumulated lots of plans.
Compact view and Non-compact view for Plan types
For plan types, by default, the display of the reading plan is in compact mode for multiple tracks but non-compact mode for single track. The compact mode shows the Bible readings per track in a row or more in case they will not fit, while the non-compact mode always show each track readings in a separate row. You can switch back and forth between these two modes for multiple tracks by going to the Menu->Toggle Compact view. See below for screen shots.
Navigating through the plan or progress tracker
Below is the main reading plan screen in compact view mode which shows the track readings per day in a row.
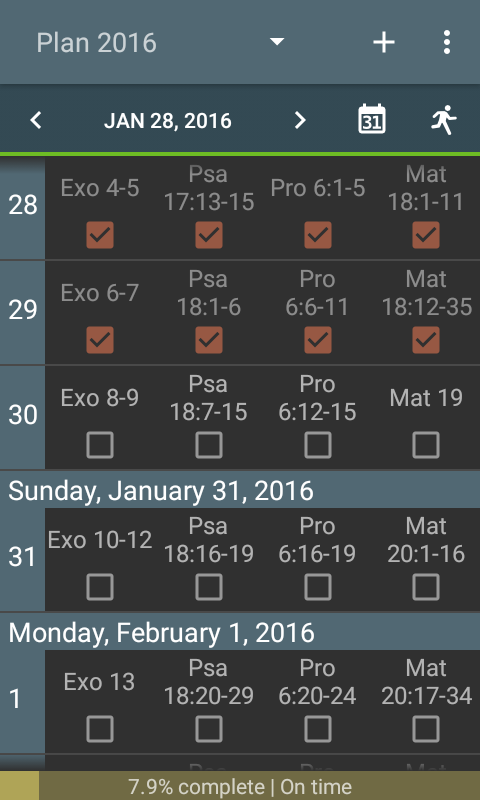
The top bar items:
- Plan selector
- On the upper left is the plan selector, Plan 2016 in the screen shot. You can use this to switch to another plan. You can limit the list of plans by archiving old plans (see Managing plans).
- Action bar actions / menu
- The icons on the top right includes:
- New Plan/Progress
- Manage plans
- Help
- Print...
- Resync dates
- Item tap action
- By default, tapping the verse in the non-Compact view will not fire any actions so you can use this to select what kind of action you want like Reading the verse itself.
- Toggle Compact view
- Style read content
- When you select the Read icon or tap the verse in Compact view, MySword will automatically go to that verse highlighting the verse range in a box with a border and background color. By default, the background color is Highlight 3 (yellow), the border color read and thickness 2 px and opacity 50%. You can change that using this menu.
- The icons on the top right includes:
- Left (<) arrow
- Used to navigate to the previous day.
- Date
- Go to a specific day by selecting the date using the Date picker.
- Right (>) arrow
- Used to navigate to the next day.
- Calendar icon
- Go to the date today.
- Catch up icon
- Go the oldest date with an unread track. (Only present in Plan type).
- Add reading (+) icon
- Add a reading entry for a specified date (Only present in the Own pace / progress type).
By default, only a handful of entries are initially loaded near the current date for fast opening of the screen. But when you swipe up or down, more records will be read and shown. You can also use the navigation arrows on the top as well as the date buttons.
The item rows:
- Day
- On the leftmost is the day of the month shown in compact view.
- Top date bar
- Shows the day of the week as well as the full date above the verses. This only shows for Sunday as well as the first day of every month.
- Verse
- Every track is shown to the right of the Day column with a check box below. Tapping the verse will go to that verse for reading highlighting in the box the verse range to read.
- Check box
- When you finished reading, you can go back to the Reading plan screen then tap this check box for every track you finished.
- Long tapping will show the Edit date read, in case you want to record a previous day reading as the default date read is always today.
The bottom row indicate the reading progress which includes the % complete and an indicator if you are On time, late or ahead (including number of days). The background color is green for On time or ahead, Orange in case of late and Red in case of very late.
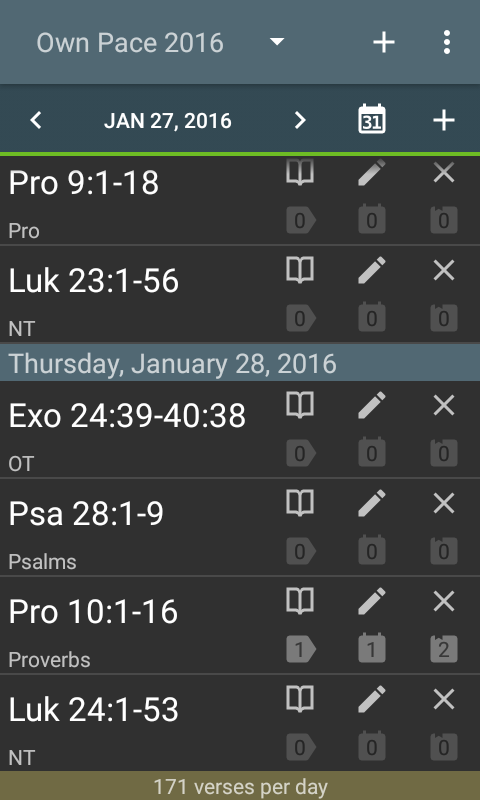
For the non-Compact view, here is the screen shot:
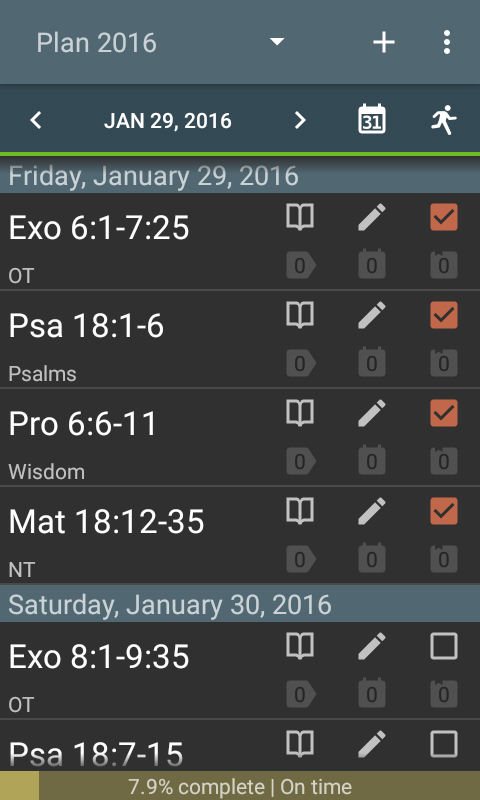
The Date header is included to group track readings for a day and it also shows the track name which is absent in the Compact view. To the right side we have:
- Read icon
- Go to that verse for reading highlighting in the box the verse range to read
- Edit icon
- To change the date in plan type, or the track and verse range for own pace / progress type. You cannot change the date for the own pace / progress type so you will need to use the Delete icon instead and add reading again.
- Check box
- When you finished reading, you can go back to the Reading plan screen then tap this check box for every track you finished.
- Adhoc Tag notes count
- The number of adhoc tags and tags with notes for the verse range reading that you added or edited on that date.
- Long tap to show the links to verses in case count is not zero.
- Personal notes count
- The number of personal notes for the verse range reading that you added or edited on that date.
- Long tap to show the links to verses with notes in case count is not zero.
- Journal entries count
- The number of journal entries for the verse range reading that you added on that date.
- Long tap to show the links to journal entries in case count is not zero.
Reading a verse range in a plan
If you tap the verse in the compact view with multiple columns like in the Navigating through the plan or progress tracker screen shot, or the Read icon in non-compact view (or the verse in case you set the Item tap action in the Menu to Read), the Reading Plan screen will close and the verse to read will show in the Main screen using the current Bible and the range of verses to read is highlighted and boxed as shown below.
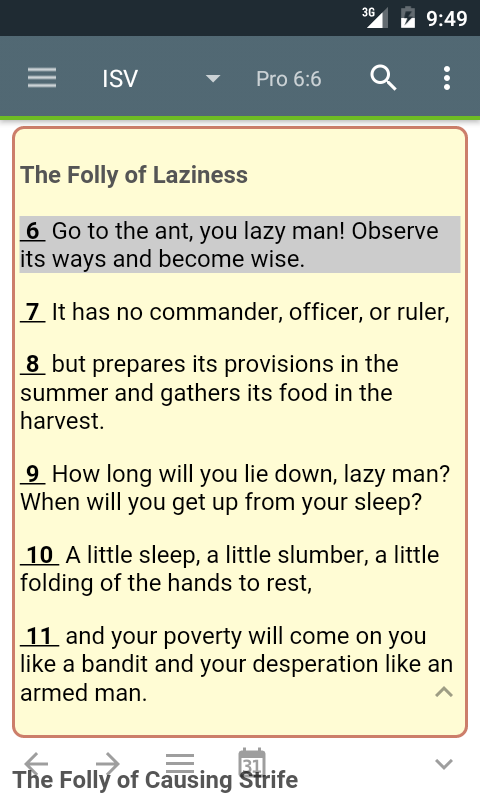
The highlight will stay there even if you exit MySword, update the bookmarks, perform search, select other verses, etc then come back, as long as you did not select another verse range to read in the Reading Plan screen. So in case you are not able to complete a very long range of verses (multiple chapters), you can always continue from where you had left off, just make sure you tap the verse number of the verse continuation so that when MySword restarts you will not end up in the beginning of the verse range. In case you need to do search or check other verses, just make sure you add the current verse to the Bookmarks list so that it will not be difficult for you to find back the verse using the Back button.
Now when you finished reading, you can mark the verse range as Read. See below.
Marking a reading as read or unread for Plan types
After reading a verse range for a certain track, you can mark it as Read by going back to the Reading Plan screen (using the Reading Plan icon/button), then tap the check box below the verse range of the track in case of Compact view or the check box to the far right. Then you can proceed to the next or other track or even read in advance verses on the next dates.
If you accidentally tapped the wrong check box, you can easily mark that as unread or undo the operation by just tapping again the check box. Please note that in case you added tags with notes, personal notes or journal entries referencing the verses so that count of tags, notes and journals are already recorded for the verse reading of the track (the numbers are visible in the non-Compact view), you will be asked for a confirmation for the unread operation. This is very important for tags and notes for old readings which are updated recently, otherwise their counts could be lost for the old date.
Updating the date read
When you mark a verse as read by tapping the check box to mark it as Read, the date that will be recorded is the current date (today). You can change the date read (or view it) by long tapping the check box then selecting a different date.
The specific date read is important for the Progress Report that can be shown by long tapping the bottom progress bar as it charts the number of verses, total count of notes and total kilobytes (KB) of notes written per day.
Resynching dates of unread entries for catch up
In case you are already very much behind in your reading and can no longer catch up (you can easily go to the oldest unread verse/track by tapping the Catch up icon, the running man icon), you can always re-adjust the dates beginning with the oldest unread entry to date it today then adjusting the succeeding entries in the reading plan. You can do this by going to the Menu->Resync dates. It will prompt you of the oldest or first unread reading date and if you want to proceed. Note that this procedure cannot be undone. And you can only always Resync to the current date (today).
In case you are not behind, it will show Nothing to resync.
Adding a reading progress for Own pace / Progress tracker
For Own pace / progress type, you can add a reading progress by tapping the + icon (Add reading) on the top second bar below the Action bar (note that the + on the action bar is for Add New Plan) as shown below.
A dialog will appear when you tap the + icon (Add reading).
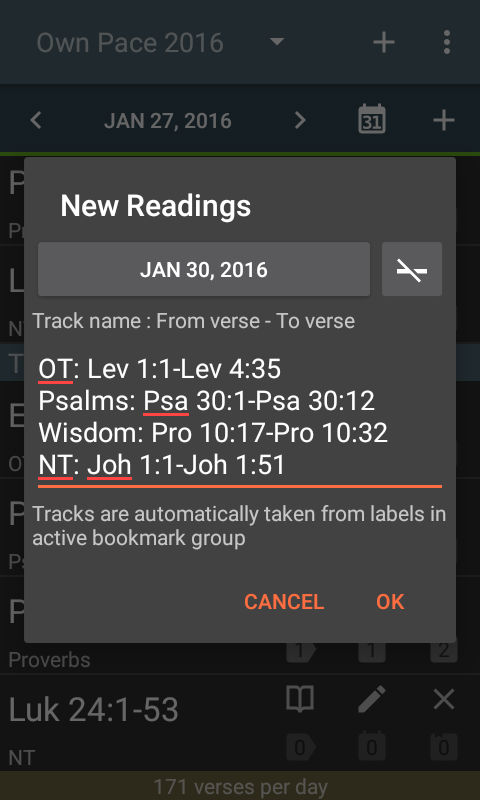
You can specify the Date Read by tapping the date button on the top and specify the readings per track. In case you properly use the Bookmarks with labels and update them, the current will be automatically guessed and placed on the text box. In case you did not read anything in a certain track, it will still be included by repeating yesterday's reading. You can use the Delete line (the icon to the right of the Date) to delete the track the cursor/caret is currently positioned. Later, if you had readings on the deleted tracks and marked them in the Bookmark screen then Add reading again, those deleted tracks will show up with guessed verse range and those that had already been added for the date will no longer appear.
You can always edit the track lines, especially in case the guessed verse range is wrong. (MySword simply check the previous date's last verse and the Bookmark verse to determine the guessed verse range and currently is not aware of wrap around and skipping books.) The format is rather simple, Track name : From verse - To verse. The track names are those you had set when you created an Own pace / progress Plan. You can always add a different track but it will not be included int he Progress Report. From verse and To verse are not expected to be complete verse references as the following will all be valid:
| Wisdom: Proverbs 1 | Whole chapter reference |
| Wisdom: Prov 1-2 | Range of whole chapters reference |
| Wisdom: Pro 1:1-7 | Range of verses in a chapter reference |
| OT: Ruth | Whole book reference |
| NT: Acts 18:19-19:41 | Range spanning two chapters with specific start and end verses |
| NT: Act 18:19-Act 19:41 | Both From verse and To verse are complete Bible references |
When you click OK, the new readings will be shown on the main screen's list.
Deleting/Editing a reading progress entry
You can delete a reading progress entry by tapping the X icon on the far right of a reading entry. But in case you just want to edit for example the Track name or the verse range, you can just tap the Pencil/Edit icon. Note that what will be displayed is in complete From verse and To verse format.
In case you want to edit the Date, as it is not possible directly, you will need to Delete the entry and Add it again.
Viewing Progress report
The progress bar at the bottom gives a quick summary of your progress for Reading plan type or the reading speed for Own pace / progress type. By long tapping the progress bar, a more detailed Progress Report will show up. The screen shot below shows the top screen of an Own pace / progress type.
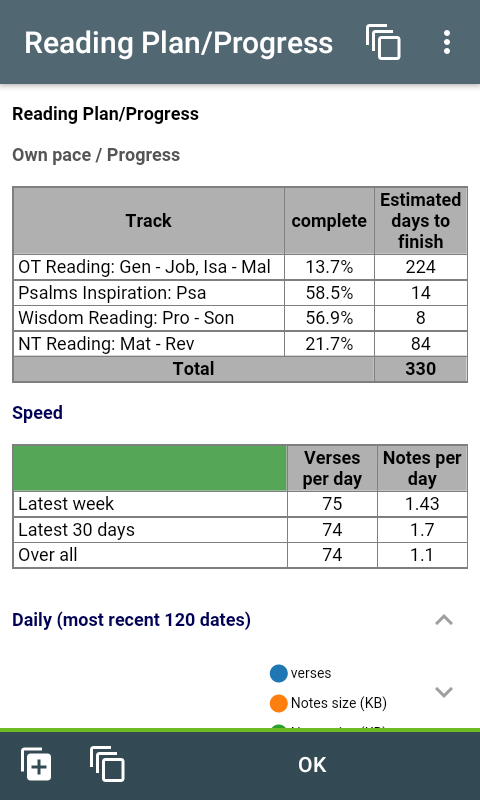
A similar but simpler report will show for Reading plan type, the top portion of which is just a repeat of the progress bar information on the main screen.
For the bottom portion of the Progress report, the charts shown this time is common for both types. Note that the charts are only available in Jellybean, Kitkat, Lollipop, Marshmallow or higher.
- Daily (most recent 120 dates)
- The number of verses read, number of notes (including tag notes and journal entries) written and the total notes size in kilobytes (KB) per day for the most recent 120 dates are displayed in the chart. The number of verses is i bar chart while the notes and size are in lines.
- Monthly
- A monthly chart is also included below the Daily.
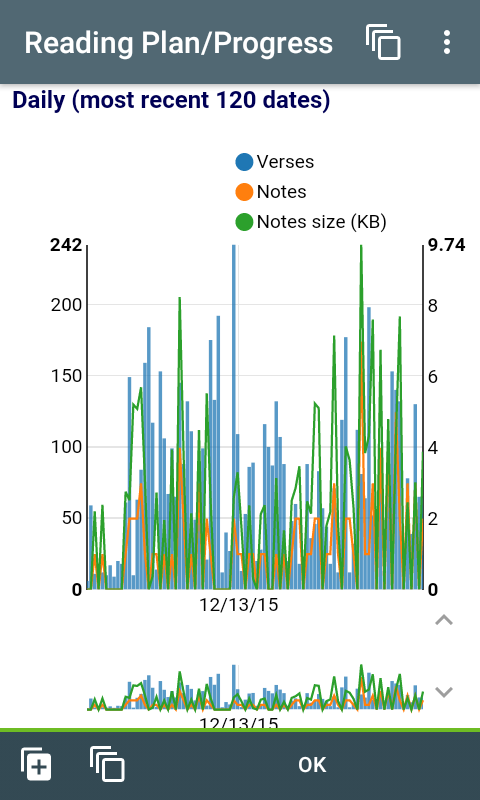
You can also adjust the range of dates in the chart by tapping then dragging the mini chart at the bottom of each charts. Besides, you can also tap a bar or line on the chart to see details about a specific date for Daily or month for Monthly in a popup as shown below.
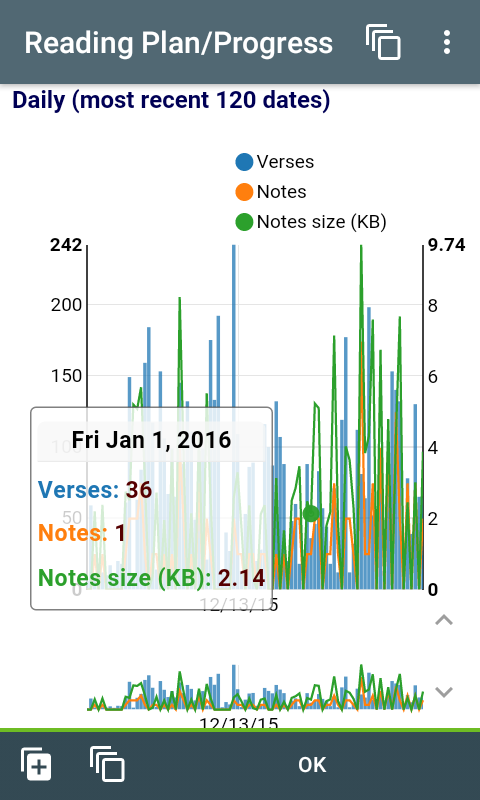
The charts can be better viewed in landscape or tablet screens.
Printing the reading plan / progress
You can print your Reading plan or Own pace / progress if you are using Kitkat or higher (and even save it as PDF). To print, go to Menu->Print... The print preview will appear as shown below, then you can tap the Print icon on the top right.
